
Last Updated on September 18, 2025 by Sheryl Cooper
Inside: It’s so easy to make 3-dimensional apple tree art. Simply grab some paper tubes and paper and invite your toddler or preschooler to stamp apples on the tree. A fun fine motor experience!
When was the last time you introduced 3 dimensional art to your toddlers or preschoolers?
There are so many fun ideas, including this apple tree art activity, and yet many teachers overlook the importance of adding 3 dimensional art to their lesson plans.
When children are working with 3 D art, they are offered the opportunity to explore from different sides or angles.
They can actually hold it, turn it, figure out how to move it while adding paint and other materials. This provides extra fine motor challenges, too!
👉 Note: Make sure to scroll down towards the end of this post to find apple tree printables you can add to your apple theme!

How to Make 3-Dimensional Apple Tree Art Using Paper Tubes
Putting together this apple tree art activity was really easy.
Watch the Video
Supplies
- Paper tubes
- Corks
- Green card stock (heavy) paper
- Red washable tempera paint
- Brown washable tempera paint
Step 1: Painting the Trunk
Cut your paper tubes to the desired height.
Pour the brown tempera paint into shallow containers. (We love using the lids from our paint cups!)
Invite your toddlers or preschoolers to use the brown tempera paint to cover the outside of the tube.
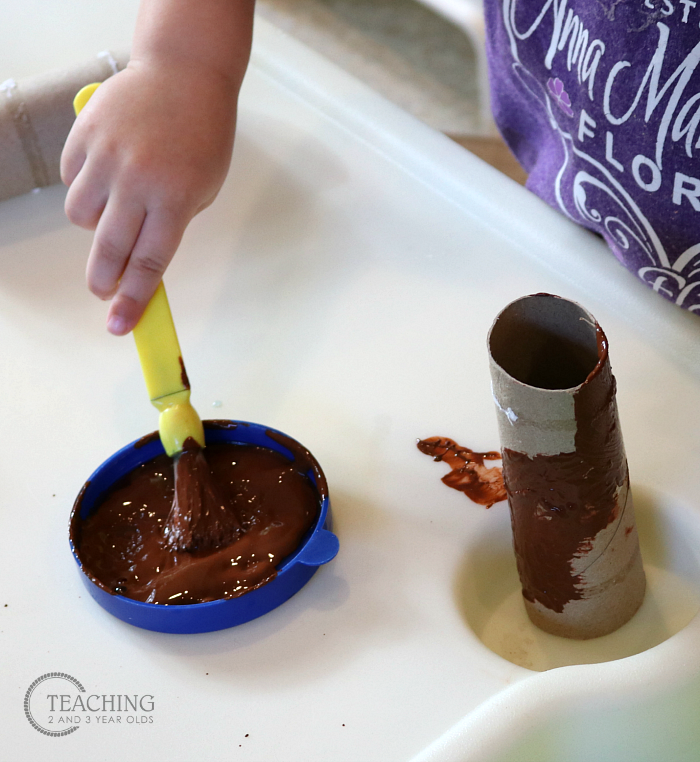
It took our children awhile to figure out how to manage the tube while painting all around it.

While some of the children tried to keep the tube standing on the table while painting around it, others realized it was easiest to actually hold the tube. These are the challenges that are not part of 2-dimensional art, and yet is an important process to work on.

Let the tubes dry completely.
Step 2: Putting the Apples on the Tree
Cut the green paper so it looks like the top of a tree. (I just did a loose cut – nothing fancy!)
Place them on the table with shallow trays of red paint and corks.
I love using corks because of the way they fit between the thumb and finger. This is an excellent pre-writing exercise!

The children really won’t need much instruction on what to do. My 2 year olds figured it out by themselves and started stamping the red paint on the paper.
Some stayed pretty much in one spot while others moved around the paper.

Some of the children rubbed the paint all around the paper rather than stamping.
There are no rules here!

When everything is completely dry, it’s time to assemble the trees.
I took one end of the paper tube and cut 2 short slits so that I could push the green paper into them.
I then added a drop or 2 of glue to secure the green paper onto the tube.
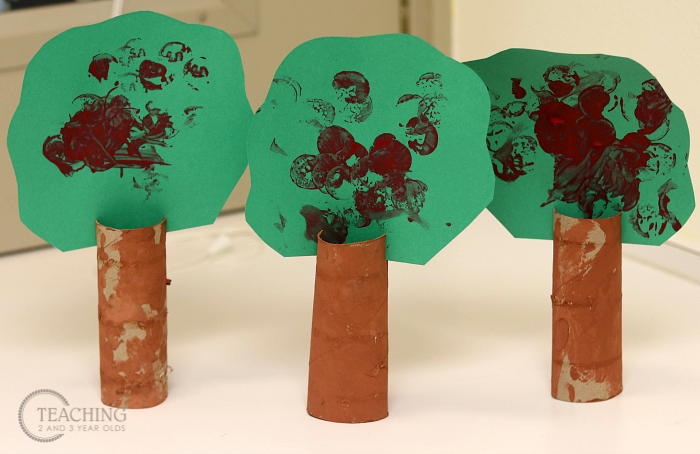
We then had our classroom apple orchard!

See how different 3 dimensional art is from 2 dimensional?
They made a nice display in our dramatic play area!

FREE Apple Tree Printable

More Apple Activities
Easy Apple Art with 2 Ingredient Puffy Paint
Quick and Easy Apple Sensory Bin
Preschool Apple Math Activity – Sorting Apples
Come see how our classroom was set up for the apple theme!
FREE CIRCLE TIME PLANNER!
Get your FREE circle time planner as a gift when you subscribe to my free weekly newsletters.
Here is my Privacy Policy
I love your fall trees !
Oh I love this idea! I would love to tie this in with our fall theme this week. Thanks for sharing!
Angel
This is great. We did trees with finger printing, but I realy like the idea of using q-tips! Thank you for sharing!
Katie, I love using Q-Tips because they are great for working those very small muscles in the fingers!